This is a guide for noScribe. NoScribe is a free open-source tool developed by Kai Dröge for transcribing or subtitling audio and video material. The tool combines various open-source technologies in a graphical user interface to create high-quality transcriptions. It uses Whisper (developed by OpenAI), among others.
Features of noScribe:
it can identify different speakers with S00, S01, S02, etc.
timestamps are added to the transcription.
filler words, laughter and uhms are skipped, and pauses are marked with ‘(..)’.
Some parts of a recording may be lost as a result, but these elements can be important for researchers. It is therefore crucial to check transcriptions and correct any errors; no automatic transcription tool is flawless. You can check and edit text in a built-in text editor with the option to listen to the audio in the background, allowing you to easily compare the transcription with the recording.
The automatic transcription is done offline, so no internet connection is needed after installation. A potential downside is that transcription can be slow on old or low-performance computers. The more powerful the computer, the faster the transcription. On a relatively powerful laptop, it was possible to transcribe a 10-minute audio recording with multiple speakers in Dutch in 6 minutes.
Other potential drawbacks:
NoScribe is actively being developed at the time of writing, so bugs cannot be ruled out. On Windows, for example, the Start button may not be visible when opening the program. Fortunately, simply enlarging the window downwards to make the component visible/usable resolves this issue.
Whisper, the automatic transcription system in the background, may tend to hallucinate during silences because it interprets the background as text, but we have not really been able to establish this yet.
The speaker identification function is not 100% accurate and may sometimes note more speakers than there actually are.
If your computer has a dedicated NVIDIA graphics card (GPU) with more than 6GB of graphics memory, noScribe can use a special technology that noticeably speeds up transcription. This requires a different installation procedure.
Otherwise, transcription is done via the internal processor or CPU, making it slightly slower.
To check if your computer has a separate, suitable NVIDIA graphics card, open Task Manager with ctrl+shift+esc and navigate to the ‘Performance’ menu.
Look for an NVIDIA GPU and check if the video memory or VRAM is 6GB or higher. Found it? Continue with the installation instructions from here.
If your computer does not have a suitable graphics card, proceed with the installation instructions below.
For computers without an NVIDIA card with more than 6GB VRAM
Go to the download page and click on the link under The general purpose version for normal PCs without a NVIDIA graphics card. Normally, this is a ‘drive.switch’ link to an online folder.
Click on the ‘noScribe_setup_0_5_1.exe’ link. A download should start.
After downloading (which may take a while), you can install noScribe like other software.
Starting the installation may take a while.
If you get the message ‘Windows protected your PC’, click on Run anyway. Windows often finds open-source software suspicious. In this case, it is a false positive and noScribe is safe to use.
For computers with a dedicated GPU with at least 6GB VRAM
Follow this link and click on the link under A special version using CUDA acceleration on NVIDIA graphics cards with at least 6 GB of VRAM.
Click on both files on the website, ‘noScribe_Setup_0_5_cuda.exe’ and ‘noScribe_setup_0_5_cuda.nsisbin’, to download them.
This may take a while. The nsisbin file in particular is large.
To successfully use the separate graphics card for transcription, a correct installation of the NVIDIA CUDA toolkit must also be present. This ensures that noScribe can harness the power of the GPU to speed up the transcription process.
To install the correct CUDA version, we need to find the GPU driver version.
Search for Nvidia control panel and open the program.
Then click on Help and then on System Information
In the ‘System information’ menu, there is a line under Details that says Driver version:
Compare the driver number with this table to find out which CUDA version is compatible with your graphics card.
Then go to this website to download the correct version.
When all noScribe files and the CUDA toolkit files are downloaded:
First, install the Nvidia CUDA toolkit.
Then restart your computer.
Make sure the noScribe_setup_0_5_1.exe file and the nsisbin file are in the same folder.
Double-click the noScribe_setup_0_5_1.exe file. It may take a while for the setup to start. Be patient.
When the installation of noScribe is complete, open noScribe.
Solving a potential bug
There is a separate bug with this version of noScribe that you may encounter. Fortunately, it is easy to solve. This [1] is reported on the noScribe GitHub, and the developers are aware of the problem.
The start screen of noScribe is sometimes incorrectly scaled, making the screen look like this:
Instead of this:
Click and drag the bottom part of the noScribe window to make the start button visible.
NoScribe is now successfully installed.
Mac
Depending on the type of processor and the version of your operating system (macOS), you need to download a specific installation file and follow the installation procedure.
Identify your computer’s processor. Click on the Apple icon in the top left and select About This Mac.
In the next menu, next to ‘Chip’ or ‘Processor’, there should be a model listed. This is either Apple M1 or M2 or an Intel processor.
Als je computer een Apple MX chip heeft, start hier met de installatieprocedure
Als je mac wat ouder is (ouder dan 2020) is de kans groot dat je een "Intel Processor" vermelding zal vinden.
Kijk in dat geval welke macOS-versie geïnstalleerd is en volg deze stappen
Voor nieuwe macs met een M1, M2, M3 of M4 processer (CPU)
Ga naar deze map en download het installatiebestand noScribe_0.5.0b_arm64.dmg.
Dubbelklik op het gedownloade dmg-bestand en sleep noScribe en noScribeEdit naar de je Applicaties (met het label drag both here to install).
Je hebt een Apple Rosetta2 Intel Emulator nodig omdat FFmpeg, een onderdeel van noScribe om video- en audiobestanden te converteren, niet compatibel is je CPU.
Installeer Rosetta2 manueel:
Open de terminal met cmd + spatie, zoek vervolgens naar Terminal en druk op enter. Of navigeer naar de map /Applications/Utilities/ en open de Terminal.app.
Met de terminal open, kopieer het volgende commando softwareupdate --install-rosetta or softwareupdate --install-rosetta --agree-to-license en druk op enter om het commando uit te voeren.
Volg vervolgens de instructies op het scherm om de rosetta2 software van apple te installeren.
Open vervolgens noScribe.
Voor macs met een intel processor
Afhankelijk van je besturingssysteem:
voor macOS 14 (Sonoma) of 15 (Sequoia): Ga naar deze pagina om de correcte installer (noScribe_0.5.0b_x86_64_unsigned.dmg) te downloaden.
voor macOS 11 (Big Sur), 12 (Monterey) and 13 (Ventura): Open deze link en download het installatiebestand (noScribe_0.5.0_x86_64_unsigned_legacy.dmg).
Bericht van de ontwikkelaars: Helaas kunnen we het x86_64-pakket momenteel niet correct ondertekenen, dus u krijgt een waarschuwing dat noScribe en noScribeEdit van niet-geregistreerde ontwikkelaars zijn. U moet handmatig toestaan dat noScribe en noScribeEdit worden uitgevoerd als uw Gatekeeper actief is.
Dit betekent dat je je computer moet geruststellen dat de software veilig genoeg is om te openen en te gebruiken.
Dubbelklik op het gedownloade dmg-bestand
Sleep noScribe en noScribeEdit naar je Applicatiesmap.
Dubbelklik nu op noScribe alsof je het programma zou starten.
Er verschijnt een error met de melding dat noScribe van een niet-geregistreerde ontwikkelaar komt
Ga naar Systeeminstellingen > Privacy en Beveiliging > Privacy and Security. Scroll naar beneden tot je een bericht ziet dat het starten van noScribe werd vermeden en klik op Open toch of Open anyway.
Doe hetzelfde voor de noScribe Editor.
Vanaf nu zouden beide programma's gewoon moeten openen als je ze opstart.
Gebruik
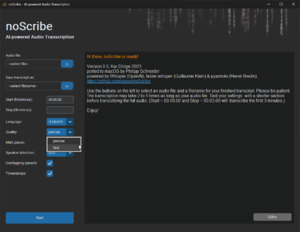
Open noScribe. Het kan even duren eer je een interface ziet, even geduld. Als noScribe start, check of je de blauwe Start-knop kan zien , zo niet, maak het venster wat groter naar onder toe.
Audio file: Klik op het blauwe mapje om je audio of video bestand te selecteren dat je wil transcriberen.Video bestanden worden automatisch geconverteerd naar .wav (zonder het originele bestand te overschrijven).
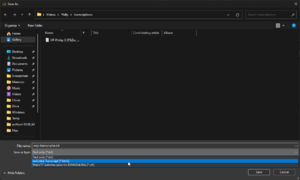
Save Transcript as: Klik op het blauwe mapje om de doelmap van je transcriptie te selecteren en selecteer het formaat:
HTML om je transcriptie te bewerken in de ingebouwde editor;
TXT om je transcriptie op te slaan als een standaard tekstbestand
VTT om een ondertitel bestand te maken.Mogelijkheden als bestandsformaat
Start (hh:mm:ss): Geef hier aan vanaf wanneer in het bronbestand de transcriptie moet starten, hh= uur, mm= minuten, ss= seconden.
Stop (hh:mm:ss): Geef aan tot wanneer in het bronbestand de transcriptie moet uitgevoerd worden. Een transcriptie maken van enkel de eerst 5 minuten, kan in dit veld met bijvoorbeeld: "00:05:00".
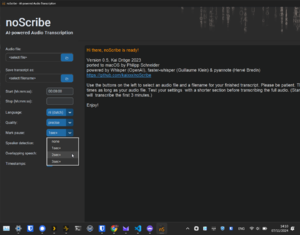
Language: Selecteer de gesproken taal van het bronbestand, gebruik de optie "Auto" om Whisper te laten analyseren welke taal er gesproken wordt. Er worden 100 talen ondersteund door Whisper. Niet elke taal zal een even accurate transcriptie opleveren. Voor Nederlands werkt Whisper goed.
Quality: Geef aan hoe accuraat de transcriptie moet gebeuren. Precise duurt langer maar is meer accuraat. Fas gaat sneller, maar het transcript gaat meer fouten bevatten. Screenshot voor de kwaliteitsetting
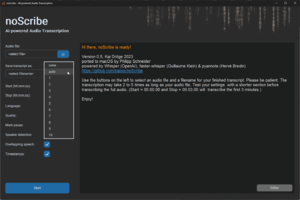
Mark pause: markeer pauzes langer dan x aantal seconden. Pauzes worden getranscribeerd als ronde haakjes met één punt per seconde ertussen, bijvoorbeeld '(..)' voor een pauze van twee seconden. Pauzes langer dan 10 seconden worden uitgeschreven als '(XX seconden pauze)' of '(XX minuten pauze)'.Pauzes markeren De opties zijn:
None: geen pauzes markeren;
1sec+: markeert pauzes langer dan 1 seconde;
2sec+: markeert pauzes langer dan 2 seconden;
3sec+: markeert pauzes langer dan 3 seconden.
Speaker detection: Opties om op voorhand een paar dingen in te stellen over het aantal sprekers in het bronbestand. Het op voorhand aangeven van het aantal sprekers kan het eenvoudiger maken om de sprekers te identificeren. De Auto-optie probeert het aantal sprekers te identificeren, maar is hierin niet feilloos. Je kan het aantal sprekers ook op None zetten als het identificeren van sprekers niet nodig is. Dit versnelt de transcriptietijd aanzienlijk, maar de transcriptie wordt dan één doorlopende blok tekst. Aantal sprekers selecteren
Overlapping Speech: Geef aan of er sprekers in het bronbestand door elkaar spreken of niet. Als deze optie aan staat, probeert noScribe momenten te markeren waarin twee mensen tegelijkertijd spreken met //dubbele slashes//. Dit is een experimentele functie.
"Timestamps:" Wanneer ingeschakeld, verwerkt noScribe tijdstempels in het formaat [hh:mm:ss] in de transcriptie. Hetzij bij elke wisseling van spreker of elke 60 seconden.
Start: De Start- of Cance-knop wanneer er een transcriptie wordt gemaakt. Deze knop heeft de neiging om niet zichtbaar te zijn bij het starten van noScribe.
Editor: De knop om de ingebouwde tekstverwerker te openen en zo nodig de transcriptie aan de hand van de audio aan te passen.
Logvenster: Een venster dat informatie geeft over de versie van de software en je verwijst naar de documentatie. Hier zal ook de voortgang te zien zijn van de transcriptie.
Transcriberen starten
Navigeer naar een audio- of videobestand dat je wilt transcriberen. Via het Audio file:-tekstveld.
Selecteer daarna het formaat waarin je de transcriptie wil opslaan en druk op "Save" of "Opslaan".
Selecteer .html als je de transcriptie wilt bewerken in de ingebouwde tekstverwerker.
Geef via de Start- en/of Stop-optie aan welk deel van het bronbestand je wilt transcriberen. Laat de opties voor wat ze zijn als je heel het bestand wil transcriberen.
Selecteer de taal als je de taal weet.
Kies de kwaliteit waarin je de transcriptie wil.
Beslis of pauzes langer dan x aantal seconden moeten worden genoteerd
Als je weet hoeveel sprekers er zijn in het bronbestand, geef dan het aantal aan.
Wanneer je denkt dat er overlappende sprekers zijn in het bronbestand en je wil dat dit genoteerd wordt, kan je dit aangeven in de Overlapping Speech:-optie.
Geef aan of je tijdscodes wilt zien in de transcriptie.
Klik vervolgens op Start.
De transcriptie zal nu starten. Dit kan even duren afhankelijk van hoe krachtig je computer is, hoe lang het audio- of videobestand is, hoeveel sprekers er zijn en hoe precies de transcriptie moet zijn. De vooruitgang zou zichtbaar moeten zijn in het logvenster met een progressiebar in het rood onderaan
Transcriptie aanpassen
Als het automatische transcriptieproces klaar is, zie je het volgende scherm.
Normaalgezien gaat de editor automatisch open. Als dat niet gebeurt, klik op de grijze Editor-knop rechtsonder in het logvenster.
In de editor kan je de transcriptie aanpassen. Het is mogelijk om ergens in de tekst te klikken en het relevante stuk audio af te spelen door op de Play/Pause Audio-knop te klikken.
De tekst zal worden gemarkeerd tijdens het afspelen van de audio.
Sla de tekst op na het bewerken.
Eerder gemaakte transcriptie aanpassen in de editor
Dit werkt enkel als je de eerdere transcriptie hebt opgeslagen als HTML.
Open de noScribe Editor. Dit is een apart stukje software. Op Mac zit dit in de Applications-folder. Op Windows zoek je naar "noScribe Editor" via het startmenu.
In de editor: Gebruik het mapicoontje linksboven, en selecteer een eerder gemaakte transcriptie.
Het kan even duren voor een transcriptie geladen is. Dit is afhankelijk van de grootte.
Als het originele bronbestand niet meer op de originele plek staat, ga je de audio niet tegelijkertijd met de transcriptie kunnen afspelen. Als het bronbestand niet verplaatst is geweest zal er audio afspelen in de achtergrond als je op de Play/Pause Audio knop klikt.
Auteur: Lode Scheers (meemoo) m.m.v. Laurens van Hamme en Nastasia Vanderperren (meemoo)