This is a guide for noScribe. NoScribe is a free open-source tool developed by Kai Dröge for transcribing or subtitling audio and video material. The tool combines various open-source technologies in a graphical user interface to create high-quality transcriptions. It uses Whisper (developed by OpenAI), among others.
Features of noScribe:
it can identify different speakers with S00, S01, S02, etc.
timestamps are added to the transcription.
filler words, laughter and uhms are skipped, and pauses are marked with ‘(..)’.
Some parts of a recording may be lost as a result, but these elements can be important for researchers. It is therefore crucial to check transcriptions and correct any errors; no automatic transcription tool is flawless. You can check and edit text in a built-in text editor with the option to listen to the audio in the background, allowing you to easily compare the transcription with the recording.
The automatic transcription is done offline, so no internet connection is needed after installation. A potential downside is that transcription can be slow on old or low-performance computers. The more powerful the computer, the faster the transcription. On a relatively powerful laptop, it was possible to transcribe a 10-minute audio recording with multiple speakers in Dutch in 6 minutes.
Other potential drawbacks:
NoScribe is actively being developed at the time of writing, so bugs cannot be ruled out. On Windows, for example, the Start button may not be visible when opening the program. Fortunately, simply enlarging the window downwards to make the component visible/usable resolves this issue.
Whisper, the automatic transcription system in the background, may tend to hallucinate during silences because it interprets the background as text, but we have not really been able to establish this yet.
The speaker identification function is not 100% accurate and may sometimes note more speakers than there actually are.
If your computer has a dedicated NVIDIA graphics card (GPU) with more than 6GB of graphics memory, noScribe can use a special technology that noticeably speeds up transcription. This requires a different installation procedure.
Otherwise, transcription is done via the internal processor or CPU, making it slightly slower.
To check if your computer has a separate, suitable NVIDIA graphics card, open Task Manager with ctrl+shift+esc and navigate to the ‘Performance’ menu.
Look for an NVIDIA GPU and check if the video memory or VRAM is 6GB or higher. Found it? Continue with the installation instructions from here.
If your computer does not have a suitable graphics card, proceed with the installation instructions below.
For computers without an NVIDIA card with more than 6GB VRAM
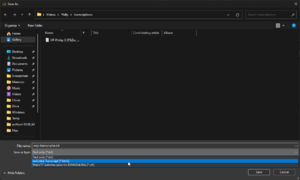
Go to the download page and click on the link under The general purpose version for normal PCs without a NVIDIA graphics card. Normally, this is a ‘drive.switch’ link to an online folder.
Click on the ‘noScribe_setup_0_5_1.exe’ link. A download should start.
After downloading (which may take a while), you can install noScribe like other software.
Starting the installation may take a while.
If you get the message ‘Windows protected your PC’, click on Run anyway. Windows often finds open-source software suspicious. In this case, it is a false positive and noScribe is safe to use.
For computers with a dedicated GPU with at least 6GB VRAM
Follow this link and click on the link under A special version using CUDA acceleration on NVIDIA graphics cards with at least 6 GB of VRAM.
Click on both files on the website, ‘noScribe_Setup_0_5_cuda.exe’ and ‘noScribe_setup_0_5_cuda.nsisbin’, to download them.
This may take a while. The nsisbin file in particular is large.
To successfully use the separate graphics card for transcription, a correct installation of the NVIDIA CUDA toolkit must also be present. This ensures that noScribe can harness the power of the GPU to speed up the transcription process.
To install the correct CUDA version, we need to find the GPU driver version.
Search for Nvidia control panel and open the program.
Then click on Help and then on System Information
In the ‘System information’ menu, there is a line under Details that says Driver version:
Compare the driver number with this table to find out which CUDA version is compatible with your graphics card.
Then go to this website to download the correct version.
When all noScribe files and the CUDA toolkit files are downloaded:
First, install the Nvidia CUDA toolkit.
Then restart your computer.
Make sure the noScribe_setup_0_5_1.exe file and the nsisbin file are in the same folder.
Double-click the noScribe_setup_0_5_1.exe file. It may take a while for the setup to start. Be patient.
When the installation of noScribe is complete, open noScribe.
Solving a potential bug
There is a separate bug with this version of noScribe that you may encounter. Fortunately, it is easy to solve. This [1] is reported on the noScribe GitHub, and the developers are aware of the problem.
The start screen of noScribe is sometimes incorrectly scaled, making the screen look like this:
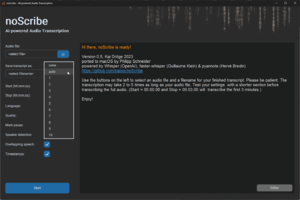
Instead of this:
Click and drag the bottom part of the noScribe window to make the start button visible.
NoScribe is now successfully installed.
Mac
Depending on the type of processor and the version of your operating system (macOS), you need to download a specific installation file and follow the installation procedure.
Identify your computer’s processor. Click on the Apple icon in the top left and select About This Mac.
In the next menu, next to ‘Chip’ or ‘Processor’, there should be a model listed. This is either Apple M1 or M2 or an Intel processor.
If your computer has an Apple MX chip, start here with the installation procedure.
If your Mac is a bit older (older than 2020), you are likely to find an ‘Intel Processor’ mentioned.
In this case, check which macOS version is installed and follow these steps.
For new Macs with an M1, M2, M3 or M4 processor (CPU)
Go to this folder and download the installation file noScribe_0.5.0b_arm64.dmg.
Double-click the downloaded .dmg file and drag noScribe and noScribeEdit to your Applications (labelled drag both here to install).
You need an Apple Rosetta2 Intel Emulator because FFmpeg, a component of noScribe for converting video and audio files, is not compatible with your CPU.
Install Rosetta2 manually:
Open the terminal with cmd + space, search for Terminal, and press enter. Or navigate to the /Applications/Utilities/ folder and open Terminal.app.
With the terminal open, copy the following command softwareupdate --install-rosetta or softwareupdate --install-rosetta --agree-to-license and press enter to execute the command.
Follow the on-screen instructions to install Apple's Rosetta2 software.
Then open noScribe.
For Macs with an Intel processor
Depending on your operating system:
for macOS 14 (Sonoma) or 15 (Sequoia): Go to this page to download the correct installer (noScribe_0.5.0b_x86_64_unsigned.dmg).
for macOS 11 (Big Sur), 12 (Monterey) and 13 (Ventura): Open this link and download the installation file (noScribe_0.5.0_x86_64_unsigned_legacy.dmg).
Message from the developers: Unfortunately, we cannot correctly sign the x86_64 package at the moment, so you will get a warning that noScribe and noScribeEdit are from unregistered developers. You must manually allow noScribe and noScribeEdit to run if your Gatekeeper is active.
This means you need to reassure your computer that the software is safe enough to open and use.
Double-click the downloaded .dmg file.
Drag noScribe and noScribeEdit to your Applications folder.
Now double-click on noScribe as if you were starting the program.
An error will appear stating that noScribe is from an unregistered developer.
Go to System Settings > Privacy and Security . Scroll down until you see a message that launching noScribe was prevented and click on Open anyway.
Do the same for the noScribe Editor.
From now on, both programs should open normally when you start them.
Usage
Open noScribe. It may take a while before you see an interface, so be patient. When noScribe starts, check if you can see the blue Start button; if not, make the window a bit larger downwards.
Audio file: click on the blue folder to select your audio or video file that you want to transcribe. Video files are automatically converted to .wav (without overwriting the original file).
Save Transcript as: click on the blue folder to select the target folder for your transcription and select the format:
HTML to edit your transcription in the built-in editor;
TXT to save your transcription as a standard text file;
VTT to create a subtitle file. Options for file format
Start (hh:mm:ss): indicate from when in the source file the transcription should start, hh = hours, mm = minutes, ss = seconds.
Stop (hh:mm:ss): indicate until when in the source file the transcription should be performed. To transcribe only the first 5 minutes, you can use ‘00:05:00’ in this field.
Language: select the spoken language of the source file, use the ‘Auto’ option to let Whisper analyse which language is spoken. Whisper supports 100 languages. Not every language will produce an equally accurate transcription. For Dutch, Whisper works well.
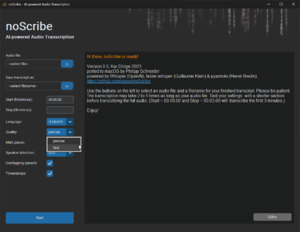
Quality: indicate how accurate the transcription should be. Precise takes longer but is more accurate. Fast is quicker, but the transcript will contain more errors. Screenshot for the quality setting
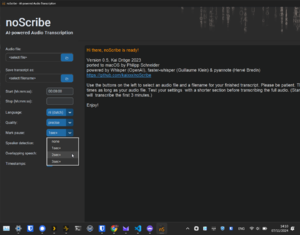
Mark pause: mark pauses longer than x number of seconds. Pauses are transcribed as round brackets with one dot per second in between, e.g. ‘(..)’ for a two-second pause. Pauses longer than 10 seconds are written out as ‘(XX seconds pause)’ or ‘(XX minutes pause)’. Marking pauses The options are:
None: do not mark pauses;
1sec+: mark pauses longer than 1 second;
2sec+: mark pauses longer than 2 seconds;
3sec+: mark pauses longer than 3 seconds.
Speaker detection: options to pre-set a few things about the number of speakers in the source file. Pre-setting the number of speakers can make it easier to identify the speakers. The Auto option tries to identify the number of speakers but is not flawless. You can also set the number of speakers to None if speaker identification is not needed. This significantly speeds up transcription time, but the transcription will then be one continuous block of text. Select number of speakers
Overlapping Speech: indicate whether there are overlapping speakers in the source file. If this option is enabled, noScribe tries to mark moments when two people are speaking simultaneously with //double slashes//. This is an experimental feature.
Timestamps: when enabled, noScribe processes timestamps in the format [hh:mm:ss] in the transcription. Either at each speaker change or every 60 seconds.
Start: the Start or Cancel button when a transcription is being made. This button tends not to be visible when starting noScribe.
Editor: the button to open the built-in text editor and adjust the transcription if necessary using the audio.
Log window: a window that provides information about the software version and refers you to the documentation. The progress of the transcription will also be visible here.
Starting transcription
Navigate to an audio or video file you want to transcribe via the Audio file: text field.
Then select the format in which you want to save the transcription and click ‘Save’.
Select .html if you want to edit the transcription in the built-in text editor.
Geef via de Start- en/of Stop-optie aan welk deel van het bronbestand je wilt transcriberen. Laat de opties voor wat ze zijn als je heel het bestand wil transcriberen.
Selecteer de taal als je de taal weet.
Kies de kwaliteit waarin je de transcriptie wil.
Beslis of pauzes langer dan x aantal seconden moeten worden genoteerd
Als je weet hoeveel sprekers er zijn in het bronbestand, geef dan het aantal aan.
Wanneer je denkt dat er overlappende sprekers zijn in het bronbestand en je wil dat dit genoteerd wordt, kan je dit aangeven in de Overlapping Speech:-optie.
Geef aan of je tijdscodes wilt zien in de transcriptie.
Klik vervolgens op Start.
De transcriptie zal nu starten. Dit kan even duren afhankelijk van hoe krachtig je computer is, hoe lang het audio- of videobestand is, hoeveel sprekers er zijn en hoe precies de transcriptie moet zijn. De vooruitgang zou zichtbaar moeten zijn in het logvenster met een progressiebar in het rood onderaan
Transcriptie aanpassen
Als het automatische transcriptieproces klaar is, zie je het volgende scherm.
Normaalgezien gaat de editor automatisch open. Als dat niet gebeurt, klik op de grijze Editor-knop rechtsonder in het logvenster.
In de editor kan je de transcriptie aanpassen. Het is mogelijk om ergens in de tekst te klikken en het relevante stuk audio af te spelen door op de Play/Pause Audio-knop te klikken.
De tekst zal worden gemarkeerd tijdens het afspelen van de audio.
Sla de tekst op na het bewerken.
Eerder gemaakte transcriptie aanpassen in de editor
Dit werkt enkel als je de eerdere transcriptie hebt opgeslagen als HTML.
Open de noScribe Editor. Dit is een apart stukje software. Op Mac zit dit in de Applications-folder. Op Windows zoek je naar "noScribe Editor" via het startmenu.
In de editor: Gebruik het mapicoontje linksboven, en selecteer een eerder gemaakte transcriptie.
Het kan even duren voor een transcriptie geladen is. Dit is afhankelijk van de grootte.
Als het originele bronbestand niet meer op de originele plek staat, ga je de audio niet tegelijkertijd met de transcriptie kunnen afspelen. Als het bronbestand niet verplaatst is geweest zal er audio afspelen in de achtergrond als je op de Play/Pause Audio knop klikt.
Auteur: Lode Scheers (meemoo) m.m.v. Laurens van Hamme en Nastasia Vanderperren (meemoo)